
Your documents are stored in folders. Folders are paginated and you can move to the next or previous page using the navigation menu.
The folder tree is expanded by default.
Document List View
In tagtog, documents are listed based on a search query. For example, listing the documents of a folder or listing all the documents that contain a specific entity. You can use these lists for batch processing, for example, to remove or download documents matching a search.
Document List Item
Each document (each row in the Document List) contains the following information:
Whether the master version is confirmed or not. A background color of the checkmark is green if the master version is confirmed.
Track document progress. If Task Distribution is active, a progress wheel indicates how many of the users assigned to the document confirmed it. Users not assigned to the document aren’t taken into consideration.
If you hover over the progress wheel, you can see the list of users assigned to the document and, from this list, who confirmed the document.
Document filename.
Document excerpt. The first piece of text from the document.
Remove. You can use this action to remove the document from your project.
Folders
Use folders to organize your documents better. The root is the pool folder, which is created by default with each new project. Folders are sorted alphabetically. You can manage folders via API or directly on the website as now described.
Create a new folder
Click on the folder you want to be the parent of the new folder. Click on the folder action Add new, write the name of the new folder and press the key ↵.
Rename a folder
Click on the folder you want to rename. Click on the folder action Rename, write the new name of the new folder and press the key ↵.
Remove a folder
Click on the folder you want to remove. Click on the folder action Remove.
CAUTION: keep in mind that all the documents stored in this folder will be also removed.
Upload content
To upload content, please select the folder you want to upload content to, and click on  . Once clicked, a modal menu is displayed.
The different input types accepted are described here: Input types
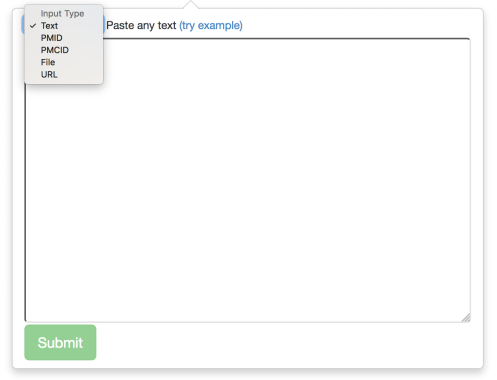
Upload menu where you can select how to import content
Upload pre-annotated documents
If you have pre-annotated documents, you can upload them directly to tagtog. You will need these two files:
The file with the text content. The file type should be one of our supported input types.
The file with the annotations. Currently, the only supported format for pre-annotated content is the ann.json.
Please remember to name both files the same, except for the extension. For example: mydoc.pdf and mydoc.ann.json. You can upload multiple pre-annotated documents in a single request. For example, 5 text files and 5 annotation files.
Please check the API for more options as replacing existing annotations.
Advanced options
Upload files with predefined document labels
If you have document labels defined in your project, you can pre-annotate these labels for the document you want to upload. This is very handy if you have metadata (e.g. time stamp, type of document, industry, severity, etc.) available you want to have readily available for your annotators or your ML model.
For example, let's say your model uses Webhooks to generate predictions once a document is uploaded. If the user has pre-annotated this document before, your model has valuable information to generate these predictions based on the pre-annotations. Language can significantly vary between departments, contexts, industries, time, etc., therefore you have an opportunity here to pick this info and to generate better predictions accordingly.
If there are Requirements set for the document labels, these conditions should be met upon content upload.
Using the API you can automatically pre-annotate documents uploading together the content and the ann.json file with the annotations.

Predefining document labels before uploading the file
Define a name
Input types such as plain text, don't have a name associated. In this case, or for regular files, you might want to define your own name for the document. Here you can define a name. The extension attached for plain text is .txt, for files, their original extension.
Format
Select Auto to let tagtog decide which is the best format (default formats).
If you want to force tagtog to represent the content using a specific format, you can select it here. For example, you can import plain text and set the format as formatted to clean and format the input.
Distribute to a group of users
If Task Distribution is enabled, here you can force to which users you want to assign the documents to. If one or more users are selected, the automatic task distribution settings are overridden (for this request only). tagtog will distribute (assign) the document to all the users selected and only to those.
Members with a role with the permission canEditSelf will be listed for selection. For each member, the role is also displayed.
Remove documents
To delete a single document, from either the document editor view or the document list view, just click on the associated remove button  . You can also delete single documents with the API.
To delete multiple documents in batch, please use the search bar. The search-based deletion of documents is also available via API.
Confirmed documents
In the document list view, each document has a checkmark, when it is green, it means the master version of the document is confirmed.
In addition to master, each document has an annotation version per member. Each of these versions can be confirmed separately to master. More information.
Confirmed documents are those with the master version confirmed. Depending on the project, it can also mean that the annotations have been reviewed by a human, and they can be used as ground truth.
To confirm documents is helpful to keep the progress of the annotation tasks. If task distribution is active, a number will appear together with the confirm check mark. This number indicates the number of users that have confirmed their version of the annotations. When you hover with your mouse, the list of users who confirmed their version will show up.
Export/Import documents
When you import the settings of a project into another project, the content (the documents and their annotations) is not imported.
If you want to export documents from one project and import them into another project, you should follow the next steps in the GUI or API.
GUI
One by one
Download the original document + the annotations and import them into the new project. The caveat of this method is that, from the GUI, you can only import annotations in the master version
1Download the original document. Open the document. In the toolbar, select the option to download the original file.
2Download the annotations. In the toolbar, select the option to download the annotations in ann.json format.
3Import the original document and the annotations. Go to the new project, select the folder where you want to import the pre-annotated document and upload both files (original document + annotations) using the content panel. You can also import multiple pairs of original document + annotations.
Download as a ZIP
Download all your content (plain.html + annotations) at once or download a filtered subset.
If you want to download only a subset of documents and annotations, you can use search queries to filter your documents.
1Download a ZIP file. Download all your content or a filtered list. Please take into consideration that the original document is not stored in the ZIP file, but only its HTML representation (plain.html).
2Import the original documents and the annotations. Go to the new project, select the folder where you want to import the pre-annotated documents and upload pairs of files (original document or plain.html + annotations) using the content panel.
API
Download the original document and the annotations and import them into the new project.
1Download the the original documents. Use a document id to download the original file: Examples: get the original document by document id, or iterate over a the API result of a search query: Examples: search using search queries. For example, you can use the wildcard * to obtain all the document ids of a project.
2Download the annotations. Use the document id to download the annotations. The same document has multiple annotation versions. You can download the master version: Examples: get the annotations of a document by document id, or you can download the version from a project member: Examples: get the member's annotations of a document by document id
3Import the original documents and the annotations. You can upload in the same request multiple pairs of original document + annotations: Examples: import a list of pre-annotated files.