
Accessible only in tagtog OnPremises, the SysAdmin page lets you manage tasks at the system level.
How to access
Go to your root domain set for tagtog (either an IP or a custom domain) and access the /-sysadmin relative path; for example: https://tagtog.example.org/-sysadmin. You will be prompted with a basic authentication panel, to enter the fields:
Username: use the subscription license name.
Password: use the subscription license key.
User Management
License model: floating seats
In OnPremises, your tagtog license allows you a maximum number of active users (seats). On top, in the tagtog ENTERPRISE plan, you can have in your system more users created. For example, let’s say you have a tagtog ENTERPRISE license for 25 annotators. In this case, you could have more users registered than 25, but only 25 of them can be active. The rest of the users must be inactive.
Floating seats: flexibly assign & re-assign your free active seats.
Active users are regular users, which can use the system.
Inactive users, however, cannot log in. Moreover, their annotations cannot be modified.
Changing the “is active” status of your users is always possible and easily done in the user panel.
Your benefit: if your team members rotate, leave, or change, you don’t have to remove their tagtog users. You can just deactivate them. Then, as long as your inactive users remain invited to the projects, all their data will still be there. Moreover, if you activate their tagtog users again, they will be able to pick up their work. This gives you more flexibility and peace of mind.
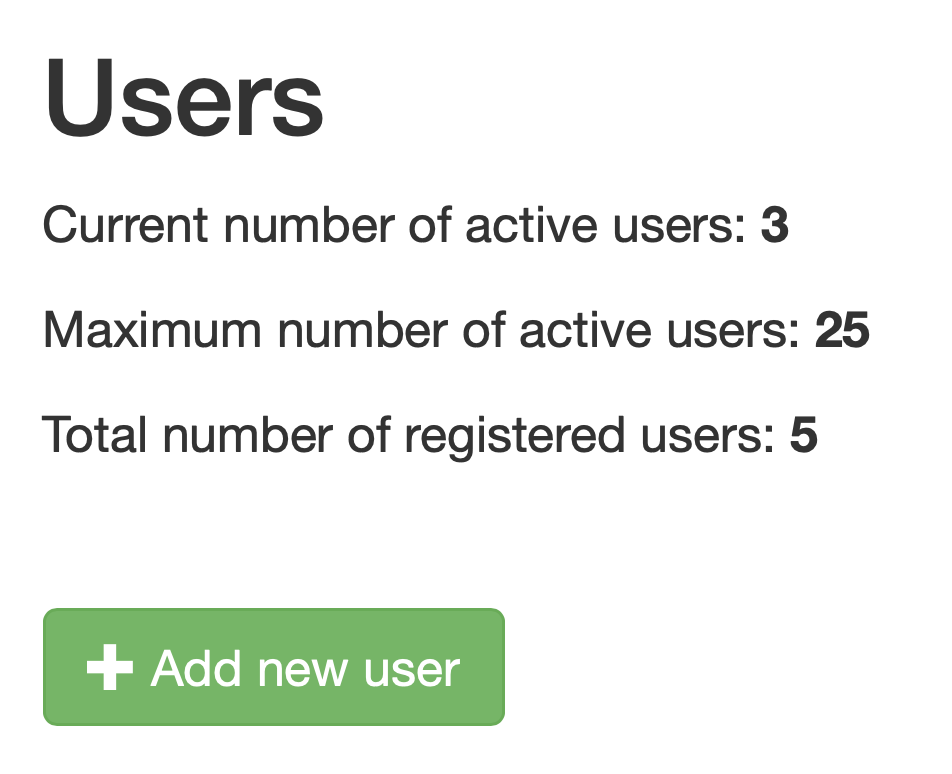
Panel informing about users in the system & limit of active users.
User panel
The user panel displays a list of the users registered in the instance. You can:
Create new accounts: you can add a user account directly in the sysadmin panel.
Edit accounts: edit the users’ accounts main information. Edit a user from the system by clicking on the edit button ![]()
Remove accounts: remove users that for example do not use anymore the application. Remove a user from the system by clicking on the remove button  .
.
Fields in the table:
Count: index of the user.
Is active: flag to indicate whether the user is active or not.
Username
Creation date: date the user account was created in.
Can create projects: flag to indicate whether the user can create projects or not. Users who cannot create projects, can only work in projects they are invited to. This is useful when you want in your organization only one or a small set of accounts owning all the projects. This makes control & management easier.
Has password: accounts with Basic authentication have password. Single sign-on accounts don’t have password within the application.
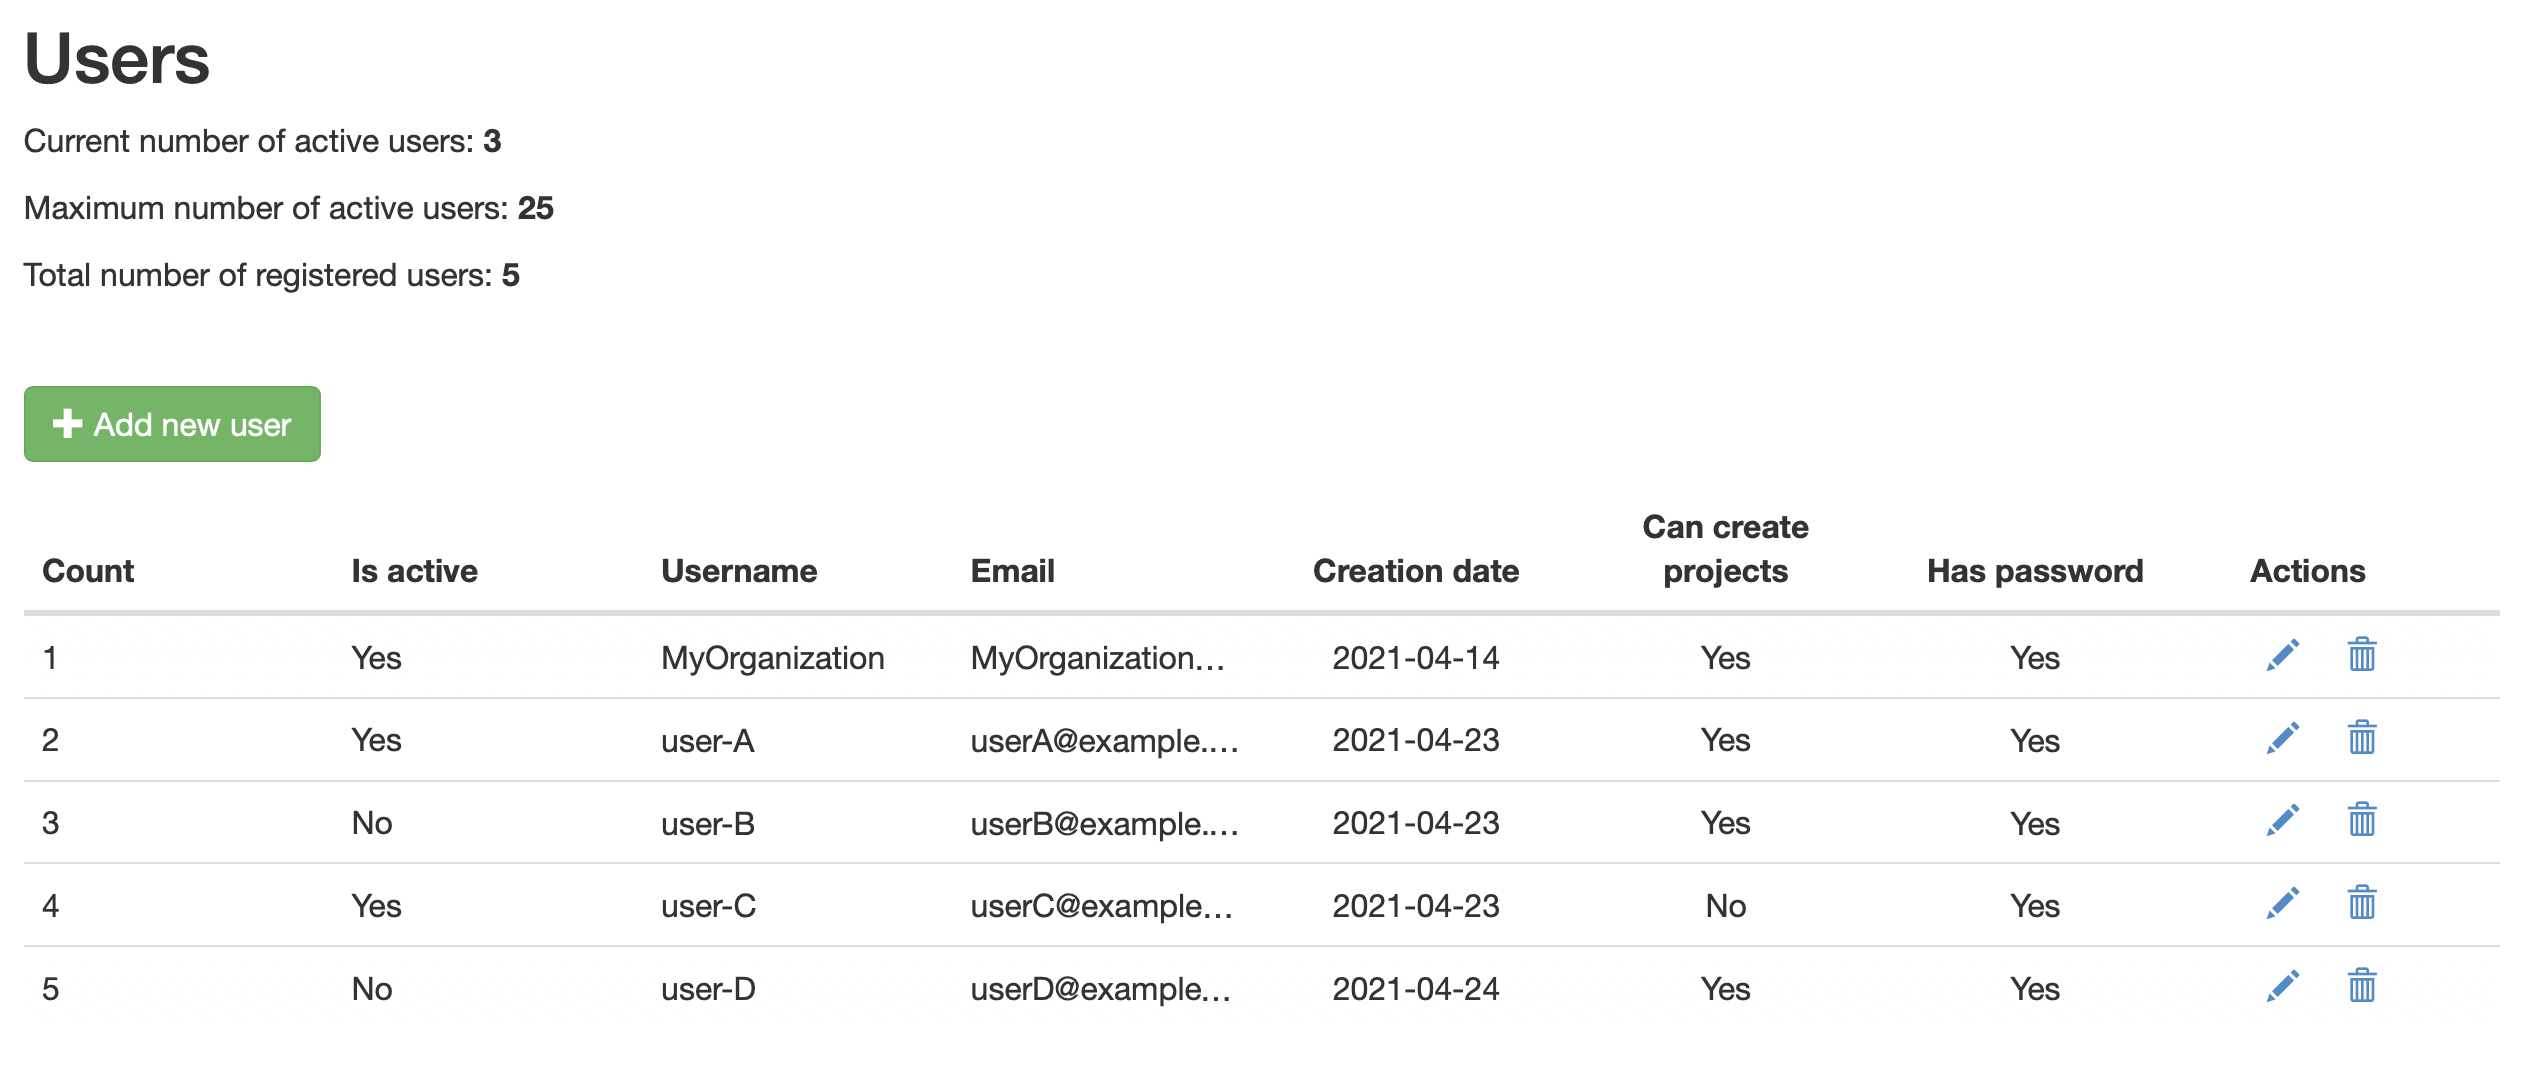
User panel: inspect, create, update, and delete users.
Create a new user
To create a new user using the sysadmin user panel, click on + Add new user. A form will show up with the following fields:
Account type: Basic authentication (regular tagtog account with username and password) or Single sign-on (documentation).
In the user panel, accounts with Basic authentication with the flag Has Password
Username: the new user’s username.
Email: the new user’s email.
Password: the password of the new user. The user can later change the password. This field is only required for accounts with Basic authentication.
Can create projects: flag to indicate whether the new user can create tagtog projects or not.
Is active: flag to indicate whether the new user will be active or not.
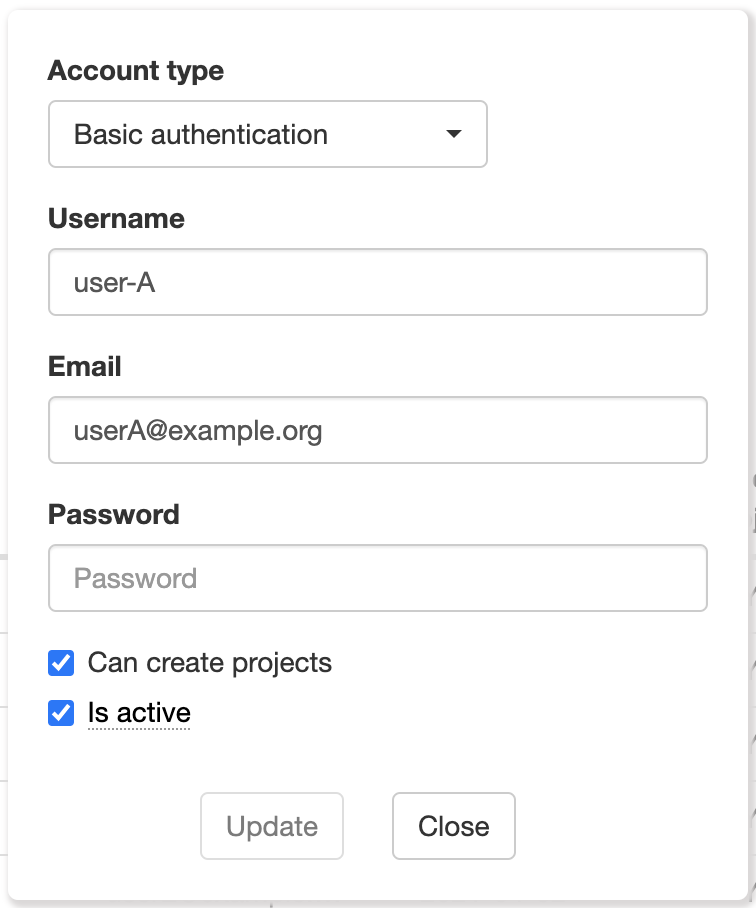
Create & edit user view
Create a new user by registration link
You can generate a registration link to share with others or to use oneself. Anyone who has this link and access to the system, can create a regular user account signing up in the application.
Teams Management
tagtog Teams allow you to group users by their responsibilities, department, guest status, etc.
Then, you can add the teams directly to your projects (rather than adding the individual members one by one). This makes user control much easier. For example, with teams you can change in one go, in a project, the role of all team users’.
On the SysAdmin page, you have all options to manage the teams of your organization. Of course, you can inspect your teams, create new ones, update them, and/or delete them.
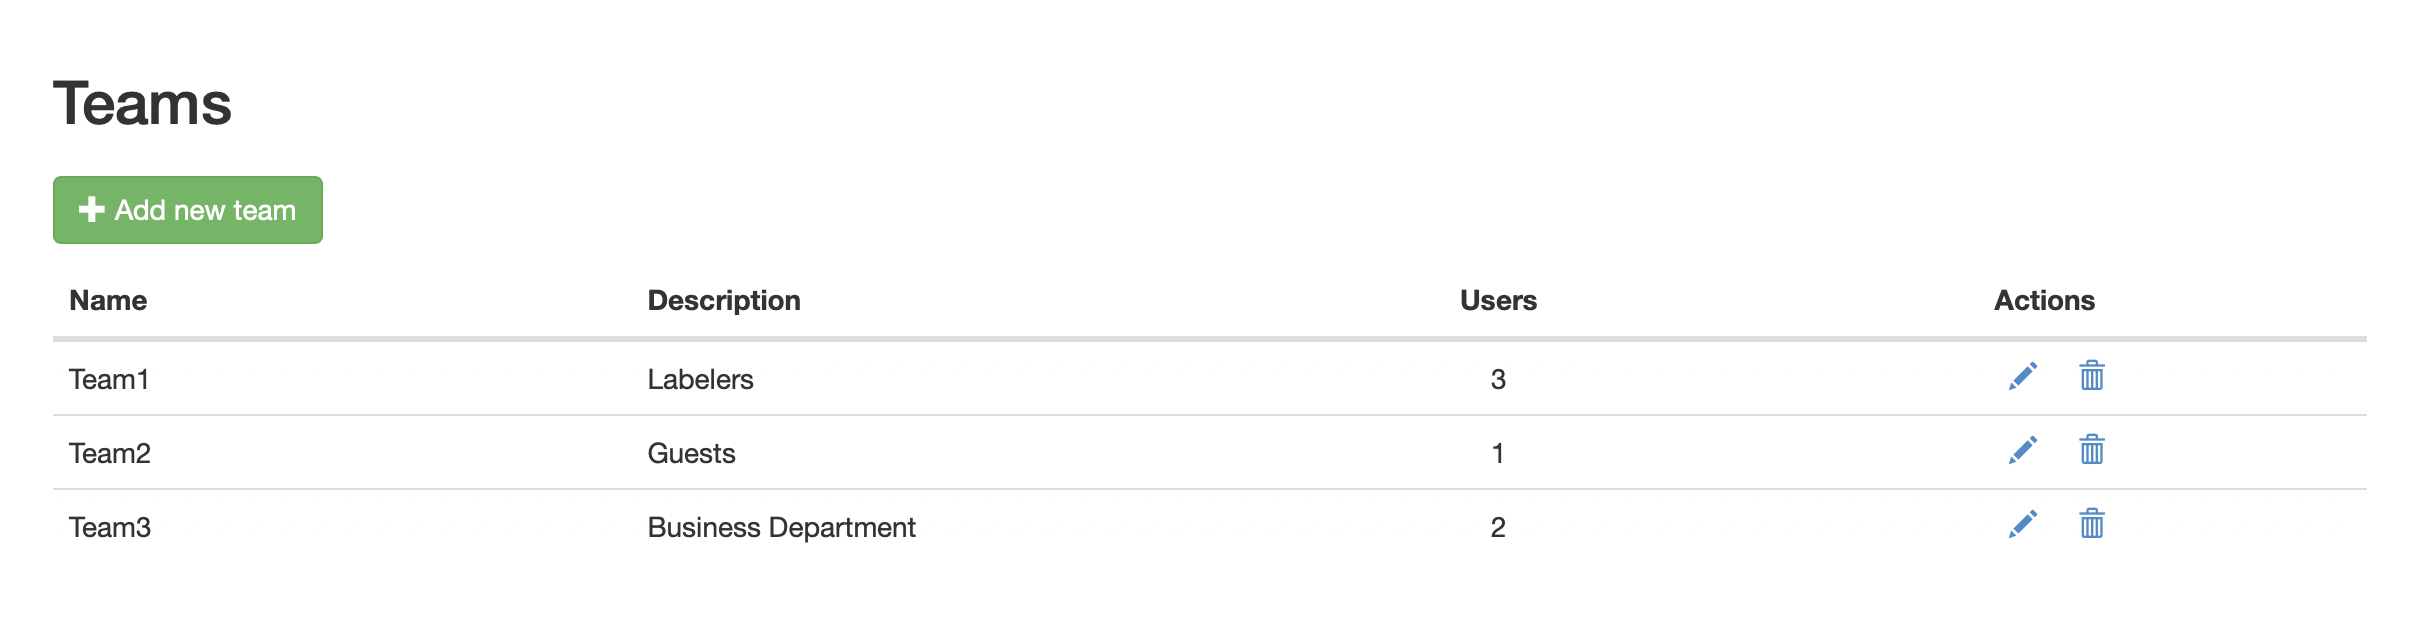
Teams panel: inspect, create, update, and delete teams.
Creating & updating a team
To create (or update) a team just:
- define the team’s name,
- set an optional description,
- and select the desired users. To select users, just click on their usernames or search by their usernames (or by email address).
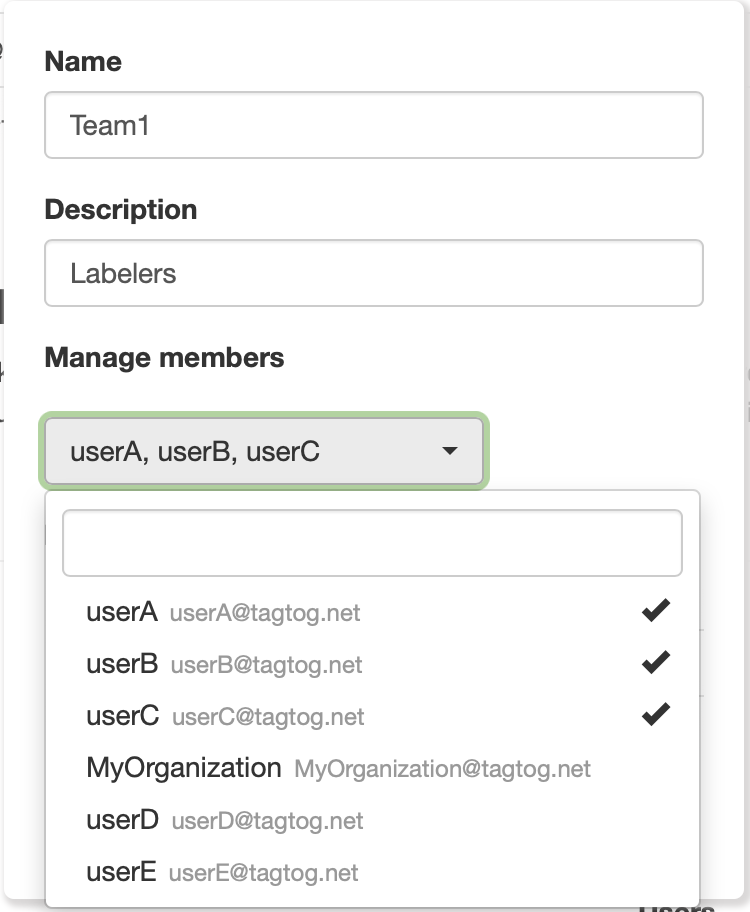
Create a team, by choosing its name and users.
Teams & Projects are always in sync
Once a team (and therefore its users) is added to a project, the team’s users and the project will always be in sync. This is better explained with an example:
- Say you you have created a team “Team1” with users: “userA”, “userB”, and “userC”.
- Then you add “Team1” to your project “DemoProject” with some role (for instance, “curator”).
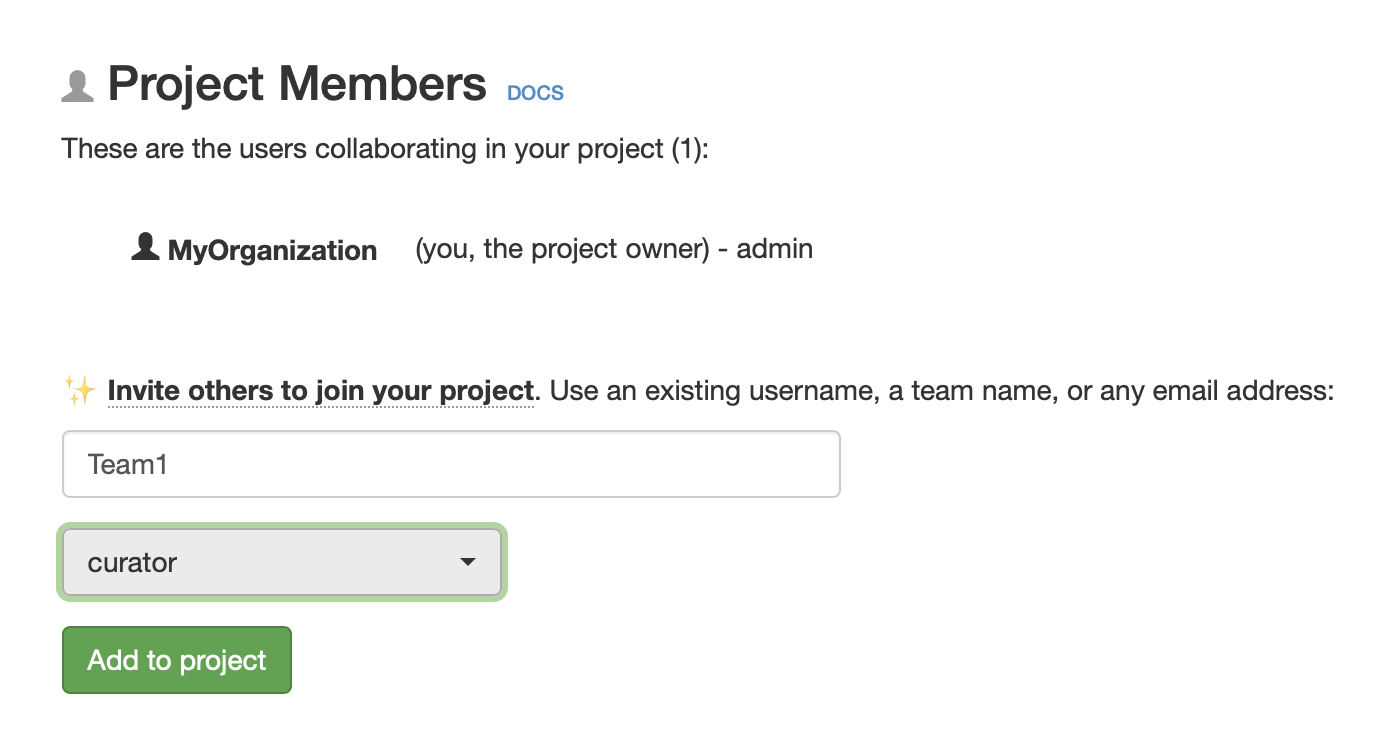
Adding a team to your project (with some role), will also add all the team's users to your project (with default same role).
- This will mean that “userA”, “userB”, and “userC” will be added, all at once, to “DemoProject” (with role “curator”).
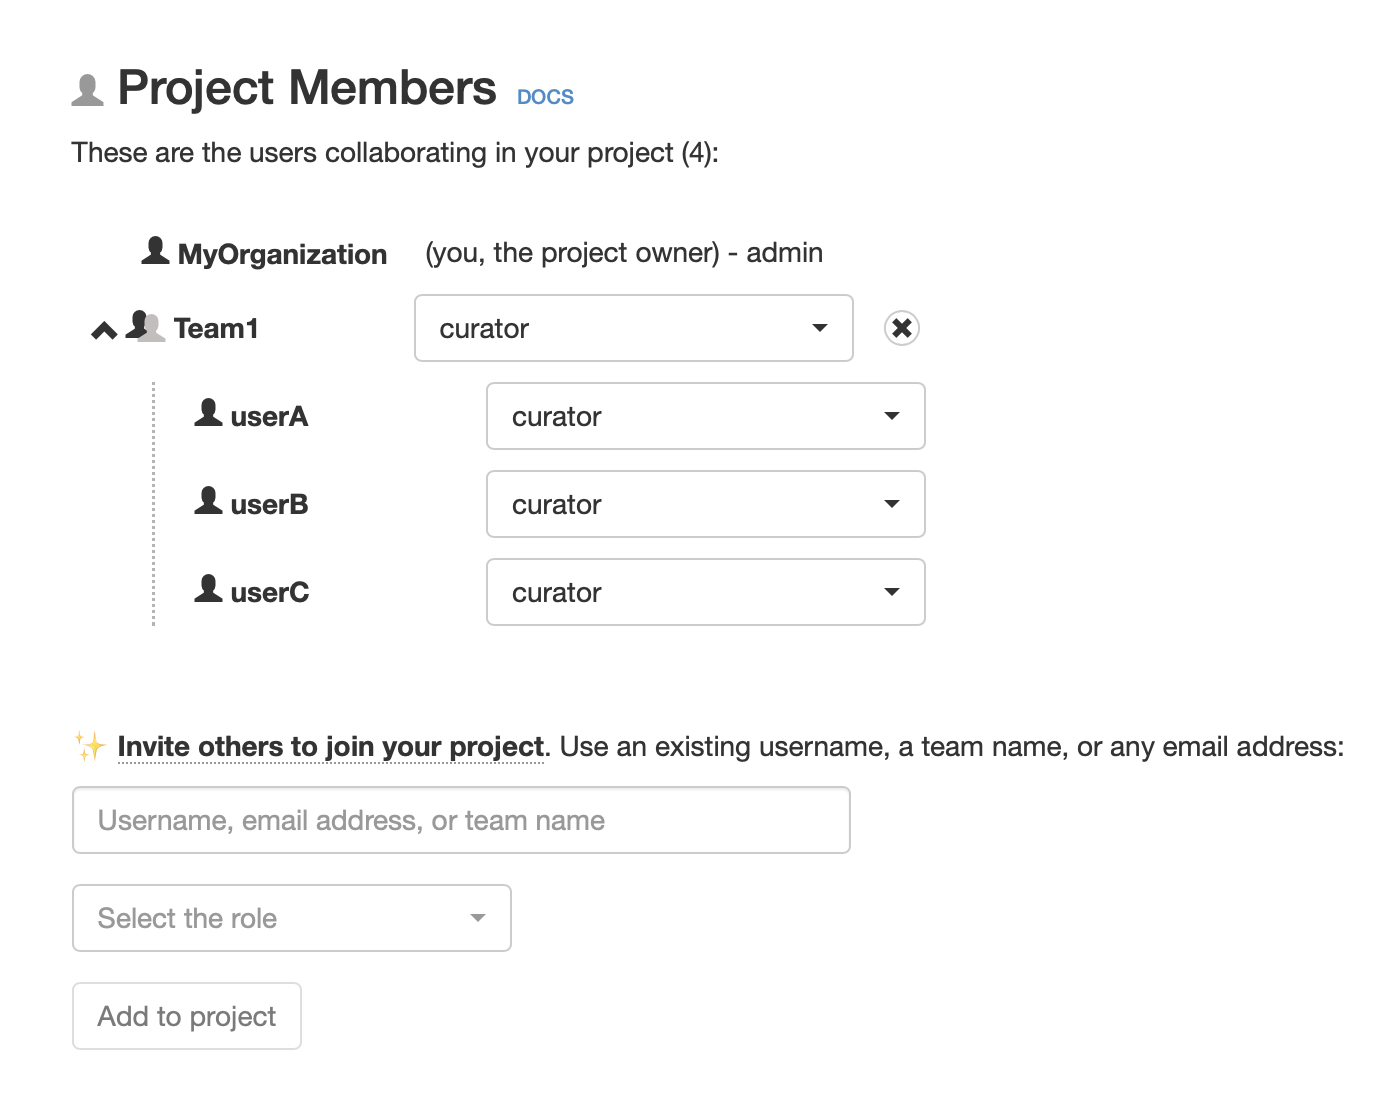
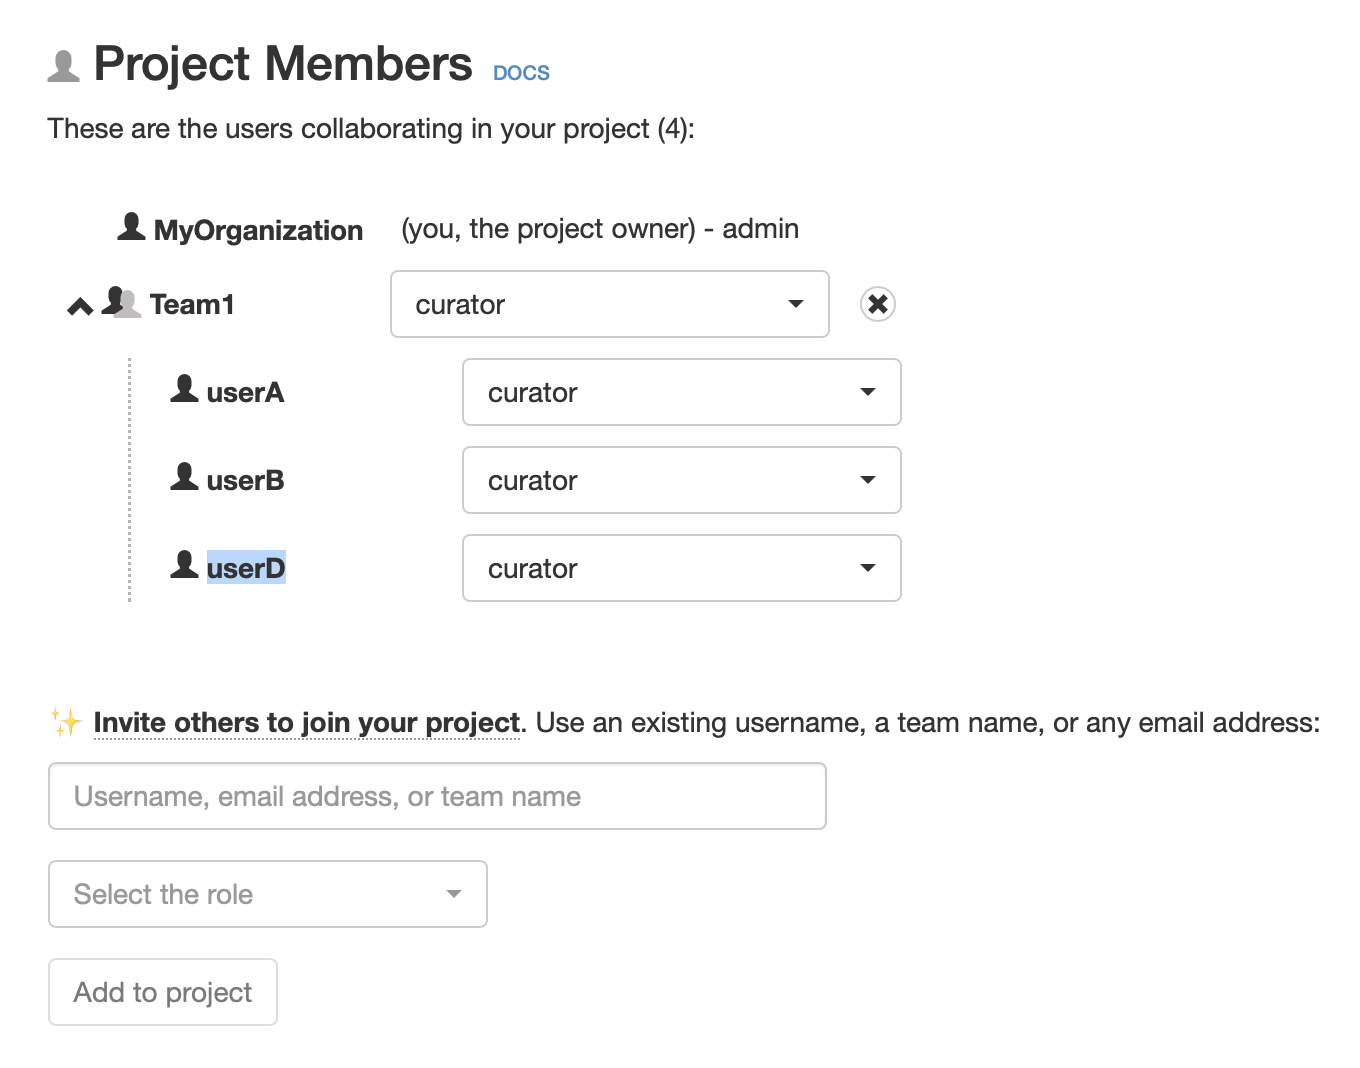
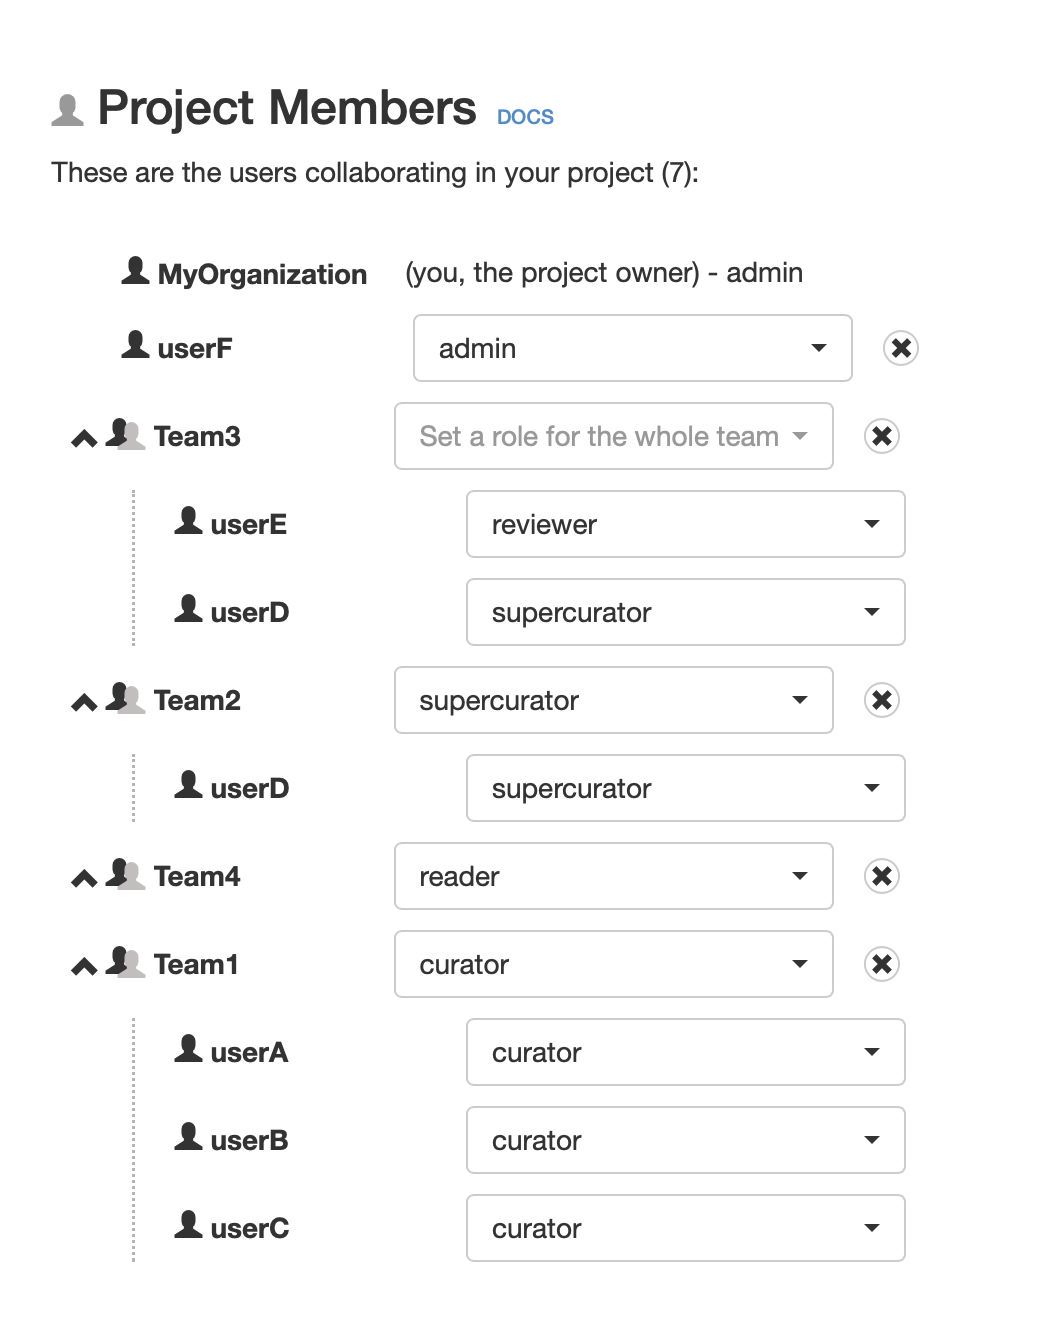
Read the teams & members from your project.
- Later on, for instance, you add another user to your team, “userD”, and remove from the team the user “userC”.
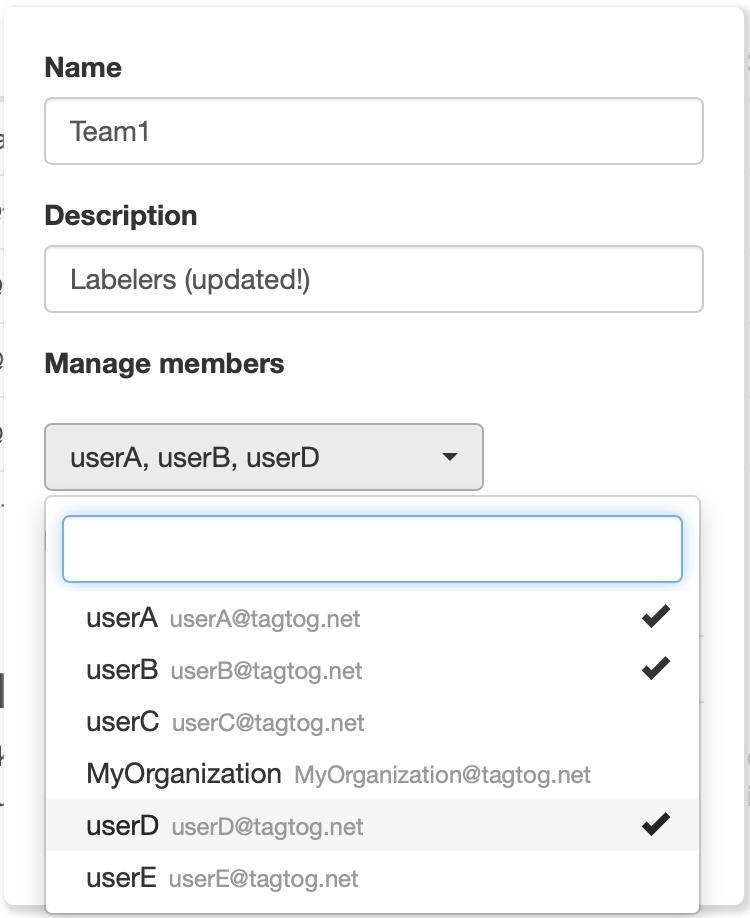
You can update your teams at any time.
- This will mean that, automatically, “userD” will also be added to “DemoProject” (with role “curator”), and that “userC” will be removed from the project. Of course, since “userA” and “userB” were not affected, they will remain in the project.
Your teams & projects are always in sync.
Deleting a team
To delete a team just click on its associated removal button (the trash can icon). You will be asked in a 2nd-step dialog to confirm that you do want to delete the team. On top, you can confirm or not the checkbox “Remove the team’s users from the projects they are assigned to”:
- If you leave the checkbox unchecked, the team will be deleted from all associated projects. However, the team’s users (if any) will remain in the respective projects, with the role they already had.
- If you check the checkbox, the team and also the the team’s users will be deleted from all associated projects.
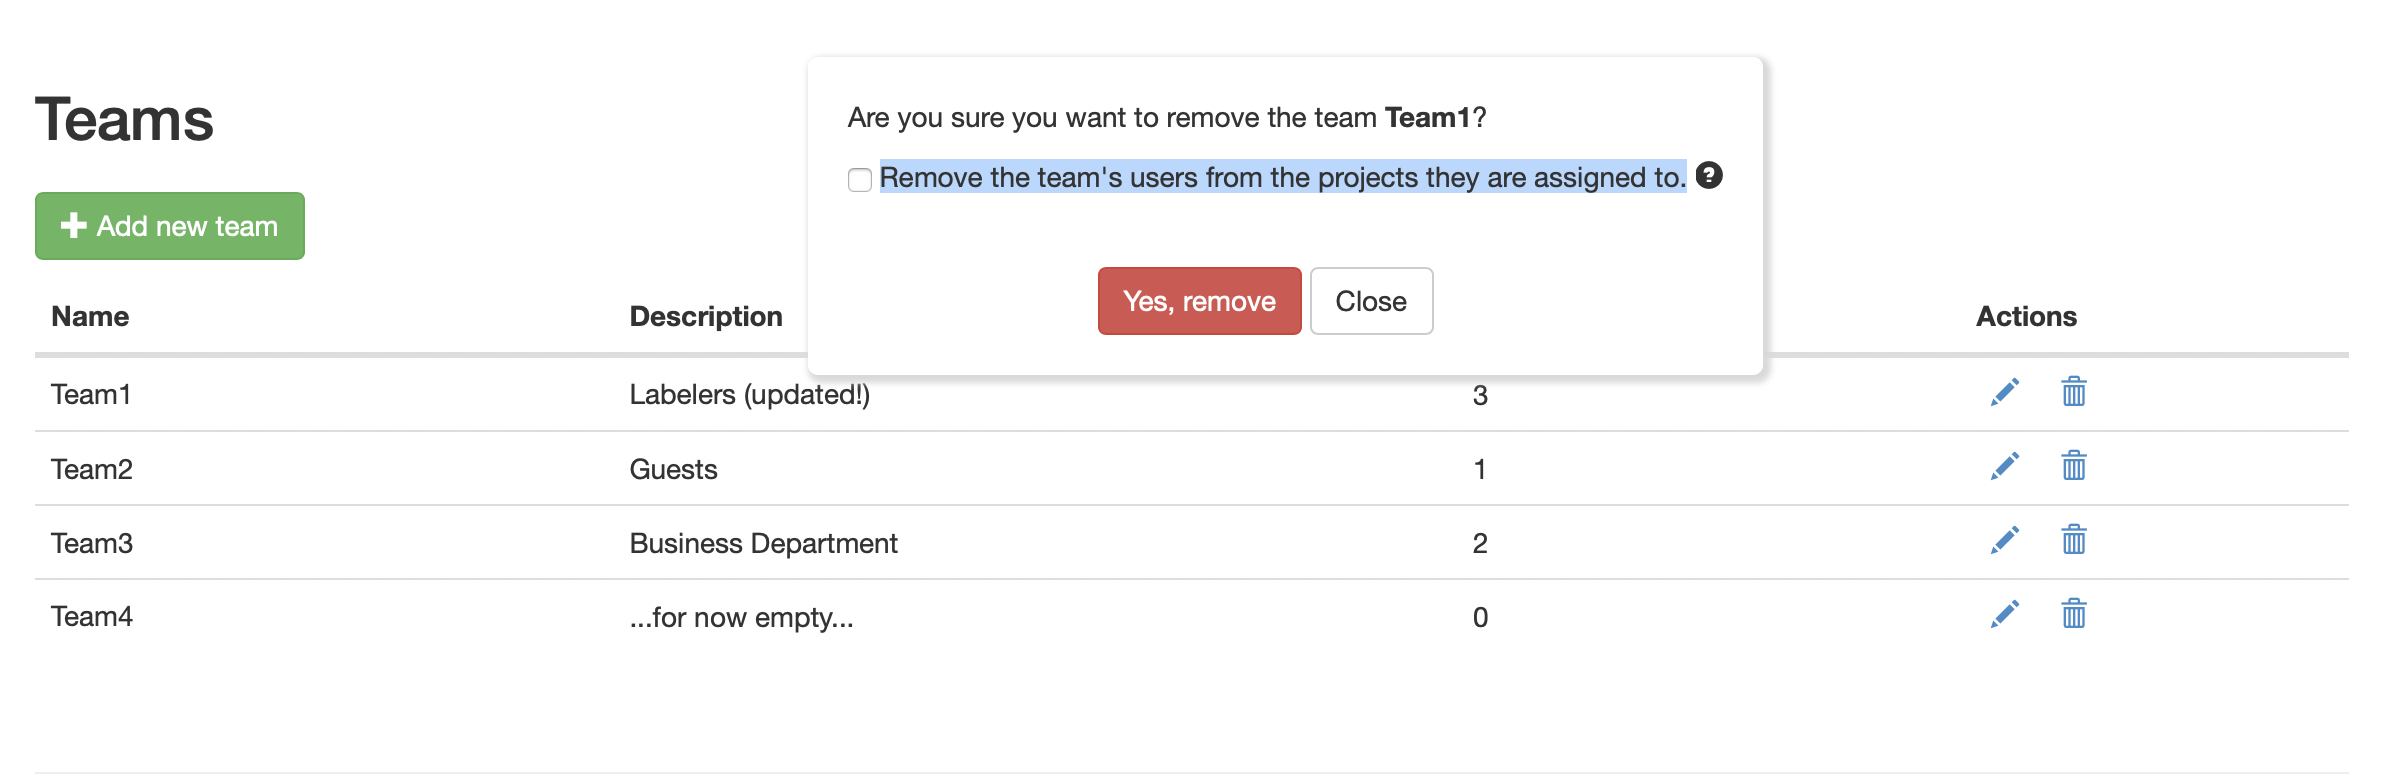
You can delete teams, thus removing the teams from the associated projects, and also possibly the team's users.
Important: the removal of project members/teams cannot be undone! Please make sure you have downloaded their annotations before, or that you have merged their annotations into the master version.
Teams are flexible
With tagtog Teams, you can:
- Add/update/delete the team’ users at any moment
- Have in a project multiple teams
- Have one user belong to 2 or more teams, also in a project
- Define empty teams (that is, without users) and add them to projects
- Combine in a project individual members and teams
Teams give you more tools to control your users' level of authorization.
Roles & Permissions
In the admin panel you can find a permission matrix where you can check & modify the permissions of existing roles or to create custom roles. After, these roles can be assigned to users at project level.
All the permissions are explained here: Multi-user annotation - permissions
By default there are three roles in the system: admin, supercurator and reader. The permissions for these default roles cannot be modified. Admin role cannot be removed (the creator of a project, the owner, will always have this role assigned). The roles supercurator and reader can be removed. If you want to modify their permissions, you should remove the role, and create a new role with the same name.
To create a new role simply click on Add new role. To change a permission, you should click on the corresponding checkbox. If you hover on the permission name or on a role name, a description of the permission or the role will show up.
For each role, you can perform three actions:
![]() Edit its name/description
Edit its name/description
![]() Remove it. If you remove a role, you should indicate which is the role that will be assigned to all the users once their original role is removed.
Remove it. If you remove a role, you should indicate which is the role that will be assigned to all the users once their original role is removed.
Change its permissions
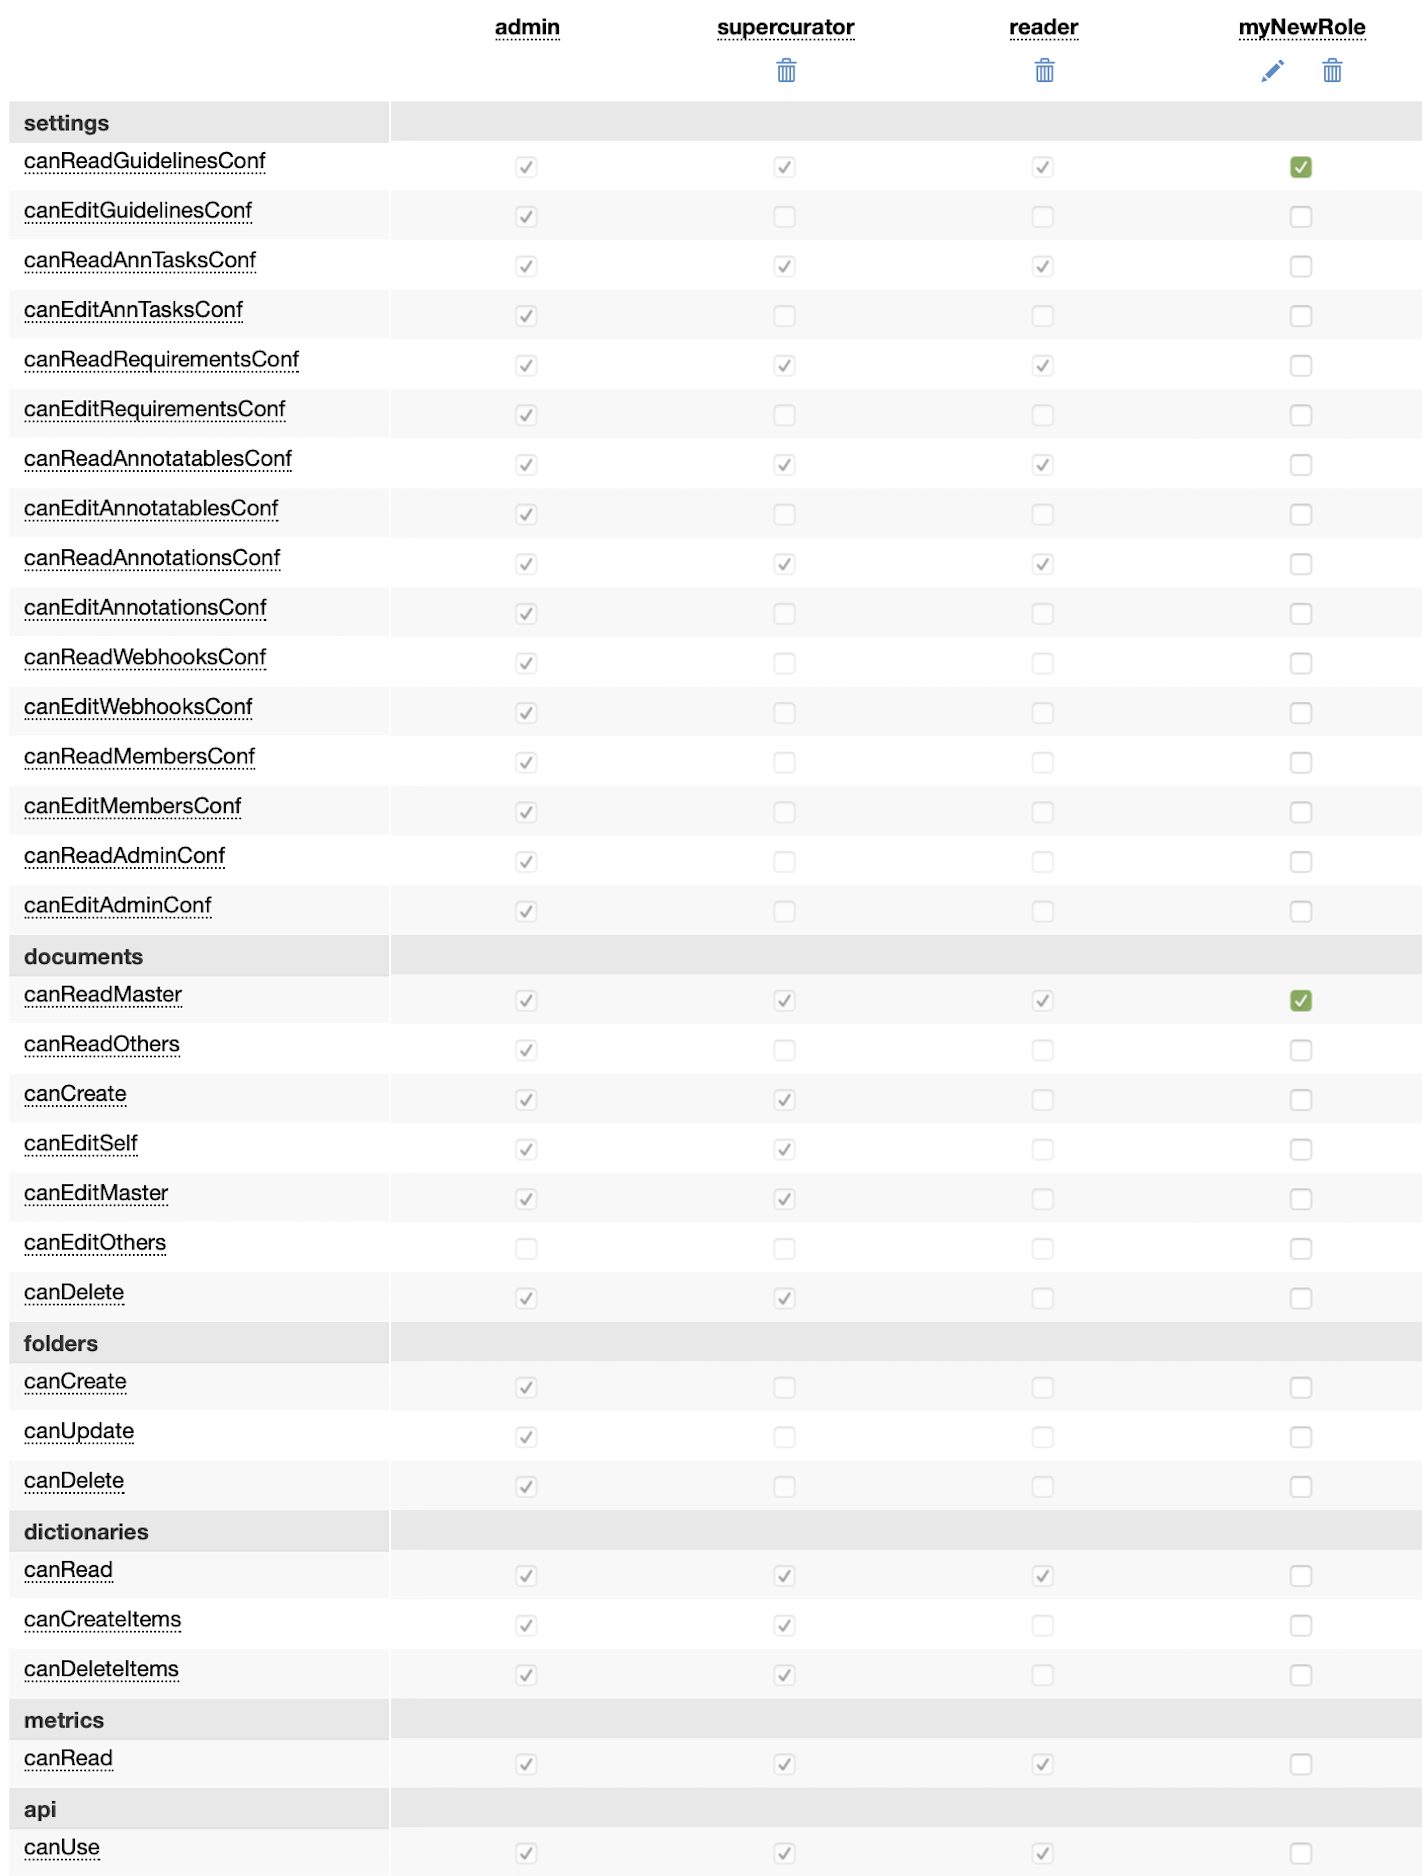
Permission matrix. In this example, in addition to the default roles, there is a new role myNewRole
Single Sign-On (SSO)
OpenID Connect (OIDC)
You can link to tagtog your OpenID Connect Provider (e.g. KeyCloak, Auth0, Okta, AWS Cognito, Microsoft, Salesforce.com, etc.). With this, your users will be able to login into tagtog seamlessly (with the authentication mechanism they already know).
OIDC: Setup
First of all, you must define a client for tagtog in your OIDC Provider:
- Define the client id (e.g. “tagtog”).
- Of course, set the root URL of the tagtog client as the domain of your tagtog OnPremises instance.
- Enable the “Authorization Code Flow” (also called “standard”, or “server” authentication).
- The access type should be “Confidential”.
- The authentication method should be based on client id & secret.
Then, there are 3 variables that tagtog must know about your OIDC Provider and the client you just defined, namely:
wellknownDiscoveryUrl: this is the standard.well-known/openid-configurationendpoint URL of your OIDC Provider.clientId: this is the name you give in your Provider to the tagtog client (e.g., again, “tagtog”).clientSecret: the secret (password) associated to the tagtog client in your OIDC Provider.
Moreover, and optionally, you can also configure the following tagtog-specific variables:
usersThatCanBeCreatedAutomaticallyIfNotFoundInTagtog(OPTIONAL; default=""): tagtog OIDC integration lets you choose whether users of your authentication system should have a tagtog account created automatically or not (that is, when they login on your Provider but do not have a tagtog account yet). The possible values are:""(none): no users will be created automatically unless they exist already on tagtog."*"(all): all users of your OIDC system will be created automatically on tagtog if they log in and they have no associated tagtog account yet.- comma-separated list of emails (e.g. “John@example.org,Maria@example.org,Peter@example.org”): users’ emails in your OIDC system of users that can be created automatically on tagtog if they log in and they have no associated tagtog account yet.
usernameClaim(OPTIONAL; default=preferred_usernameor, if not existing,sub): the claim (attribute) of your OIDC provider that you want to use for your users’ usernames. In practice, this parameter is only relevant if you let your users’ accounts to be created automatically if they don’t exist on tagtog yet (see:usersThatCanBeCreatedAutomaticallyIfNotFoundInTagtog). If the accounts already exist on tagtog, they are primarily identified by their email address (see below). In this case, the usernames can take any value (with some restrictions). Note that you, as the sysadmin, can create the users first manually, associating them the email address registered in your OIDC Provider, and giving them an arbitrary username. Also note that, if you rely on this variable, you can use any custom attribute/claim of your OIDC Provider.redirectTagtogRootUri(OPTIONAL; default=originating host): by default when users successfully login on your OIDC Provider, they are redirected back to the originating host, which should be your tagtog OnPremises domain. Therefore, in most cases you should not set this variable. However, sometimes, due to redirections and having “docker-in-between” the originating host might not be read properly, or otherwise be wrongly set to the localhost. For these cases, use this variable. It should be the domain of your tagtog OnPremises domain; e.g.https://tagtog.example.org(please do not write a trailing forward slash, “/”).
Finally, the way you pass these variables to tagtog is by using java dynamic properties. Example:
export TAGTOG_JAVA_OPTS="${TAGTOG_JAVA_OPTS} \
-Dapplication.auth.openid.default.wellknownDiscoveryUrl=https://mySSO:8443/auth/realms/master/.well-known/openid-configuration \
-Dapplication.auth.openid.default.clientId=tagtog \
-Dapplication.auth.openid.default.clientSecret=64934247-ea33-4ec7-8e86-197ea9be3417 \
-Dapplication.auth.openid.default.usersThatCanBeCreatedAutomaticallyIfNotFoundInTagtog= \
-Dapplication.auth.openid.default.usernameClaim=myCustomAttribute \
"

# Then, restart tagtog as normally
./tagtog_on_premises restart latest $TAGTOG_HOME
OIDC: Important to know
These are relevant aspects of the tagtog OIDC integration:
-
Scopes & claims: tagtog’s OIDC client (Relying Party) asks your OIDC Provider for only these 3 standard scopes:
openid, email, profile.In particular, we only ask for the scope
profileto get access to thepreferred_usernameclaim, might it be present. From the scopeemail, we only access the claimsemailandemail_verified(if present).Only mandatory are the claims
sub(from the scopeopenid) andemail. -
Users primary identification is by their email. This means that the mapping between your users in your OIDC Provider and the tagtog registered users is based on the email claim/attribute. In pratical terms, this means that a user on tagtog with, for instance, username “A” and email “A@example.org”, and a user on your Provider with different username “A-alt” but same email “A@example.org”, represent the very same user.
-
Valid usernames follow the regex:
[a-zA-Z][a-zA-Z0-9-]{0,39}. Trying to add users with an invalid username, either manually or “automatically” (upon user OIDC login), will throw an error. If you have good reasons to make the username regex more flexible, please let us know.
OIDC: How to use
Once you set up your OIDC integration, the tagtog login page (/-login), shows an extra option: “Log in with OpenID”. Moreover, when a non-logged-yet user goes to a tagtog page that requires authentication, the user will be always redirected to the tagtog login page.
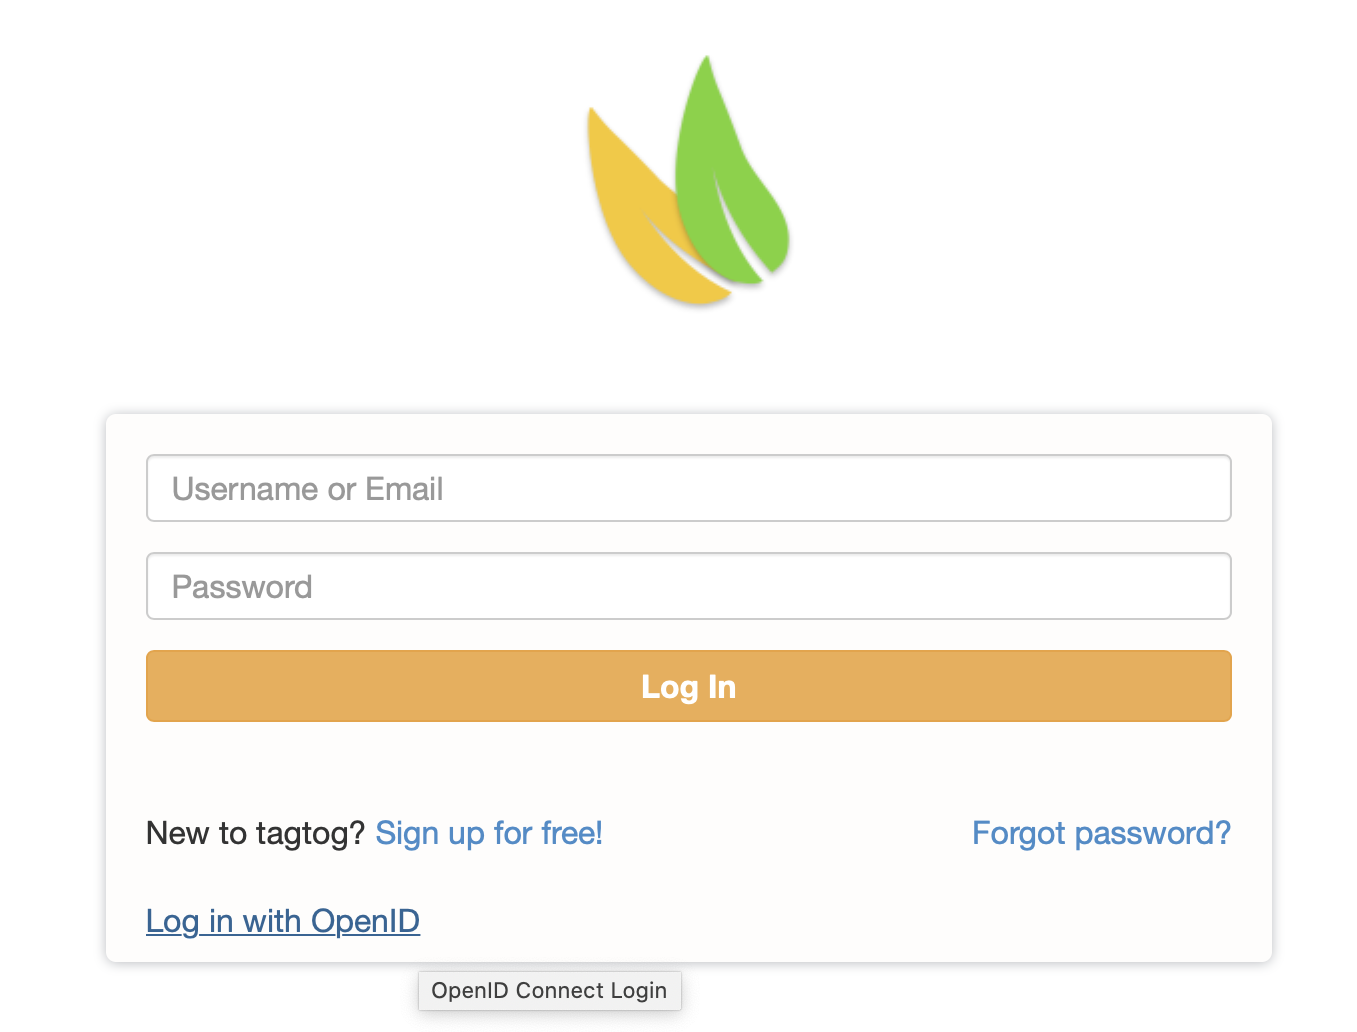
tagtog login box when OpenID Connect is enabled on your tagtog OnPremises instance.
When the user clicks on “Log in with OpenID”, the user will be redirected to the authentication mechanism of your OIDC Provider. Upon a successful authentication, the user’s data is sent back to tagtog. Two things can then happen:
-
a) If the user’s email is already associated to a tagtog user, the login is completed, and the user is redirected to the default page after login.
-
b) If the user’s email is not yet associated to any tagtog user, but the
usersThatCanBeCreatedAutomaticallyIfNotFoundInTagtogsetting allows it, tagtog creates automatically a user account on tagtog. Then the login is completed, the user can access tagtog, and is redirected to the default page. Note that such users created automatically have no associated password, and therefore (unless you later set a password), cannot login on tagtog with basic authentication.
Upon a successful login, a new tagtog user session begins, and everything else is the same and transparent to the user.
Of course, if the login is not successful on the end of the OIDC Provider, or if the user does not exist yet on tagtog and cannot be created automatically, tagtog will not allow any access and will throw a “Forbidden” error.
Finally, if the user logs out on tagtog, the user session ends with respect to tagtog. Note that tagtog does not log out the user with respect to the external OIDC Provider.
OIDC: Redirect Login URL
If you want to skip the tagtog login page, you can also just call the (tagtog) endpoint:
(GET) /-login-openid-connect
tagtog will immediately redirect to your OIDC Provider. Everything else will work the same.
Auth Tokens
An alternative SSO system on tagtog is based on authentication tokens. These can only be generated by the sysadmin (via API). The sysadmin can then have injected, in a simple reverse proxy server or just simple URL redirections, the corresponding authentication token that distinctively grant one user to login. The sysadmin can keep an internal map of reusable tokens or generate them on-demand programmatically any time a login access is required (see below the useOnce API parameter). All auth tokens can easily be deleted at any time (see above: Revoke all auth tokens).
API to request auth token
| Endpoint | /-sysadmin/request-auth-token |
| Method | POST |
| Output | String, the auth token |
Input Parameters
Defined as JSON parameters:
| Name | Default | Example | Description |
|---|---|---|---|
toUsername (String) |
- | yourUsername | The user's username you grant the authentication to. |
expirationHours (Int) |
-1 (meaning, no expiration) | 24 | The expiration in hours for the token to still be usable. Leave undefined or otherwise write a negative number to not have any expiration (meaning the token is valid until removed). |
useOnce (Boolean) |
false | true | Besides the expiration, with this parameter you can decide whether the token can be used only once (true) or not (false, i.e., multiple times until the token is removed or expires). |
Coding examples
curl -u LICENSE_NAME:LICENSE_KEY -X POST -H "Content-Type: application/json" 'https://www.tagtog.com/-sysadmin/request-auth-token' \
-d '{"toUsername": "yourUsername", "useOnce": true, "expirationHours": 48}'
# Example output: bbfd-33878148-6062-4934-a507-af4962753c8f
http --auth LICENSE_NAME:LICENSE_KEY POST 'https://www.tagtog.com/-sysadmin/request-auth-token' toUsername=yourUsername useOnce:=false
# Example output: 6f0d-90c2386a-8a33-4ad1-bd19-d4d35ad06f96
How to use an auth token
Once you have an auth token, use it in a simple GET request to login with the associated-granted user. To the request also add a redirectTo (url-encoded) parameter to indicate where to redirect to. You must add these parameters to the / (root endpoint) of your tagtog’s installation domain.
Example: https://tagtog.example.org/?redirectTo=???&token=bbfd-33878148-6062-4934-a507-af4962753c8f
Revoke auth tokens
Remove all existing token-based logins and registration links. If you think your system’s security might have been compromised, you can revoke all auth tokens thus invalidating old token-based logins and registration invitations.
Tighter authorization
Sometimes you want to have a tighter control about what the users and visitors of your system are allowed to do. You can configure the following authorization controls using java dynamic properties. Specifically, you must set the environment variable TAGTOG_JAVA_OPTS with the desired configuration values as described for each point below.
Disallow visitors to create accounts
Sometimes you do not want to allow visitors to your tagtog installation creating accounts themselves. In such a case, the sysadmin is responsible to create the accounts for all the users.
Set application.canVisitorsCreateAccounts to false (the default is true). Example:
export TAGTOG_JAVA_OPTS="${TAGTOG_JAVA_OPTS} -Dapplication.canVisitorsCreateAccounts=false";
./tagtog_on_premises restart latest $TAGTOG_HOME
Disallow users to change their account details
In such a case, the sysadmin is responsible to edit the account details of the users.
Set application.canUsersEditTheirAccounts to false (the default is true). Example:
export TAGTOG_JAVA_OPTS="${TAGTOG_JAVA_OPTS} -Dapplication.canUsersEditTheirAccounts=false";
./tagtog_on_premises restart latest $TAGTOG_HOME
Disallow users to recover their passwords using the “Forgot Password?” email
In such a case, the sysadmin is entirely responsible for the users’ passwords.
Set application.canUsersRequestForgotPassword to false (the default is true). Example:
export TAGTOG_JAVA_OPTS="${TAGTOG_JAVA_OPTS} -Dapplication.canUsersRequestForgotPassword=false";
./tagtog_on_premises restart latest $TAGTOG_HOME