
Copyright © tagtog Sp. z o.o.
tagtog installation using Docker
The tagtog system runs as a mixture of Docker containers. This works on Linux, macOS, and Windows.
HOWTO
Requirements
Your system must have installed:
- Docker
- The recommended version is >= 18.03
- To ensure that your docker installation works correctly and that you have the necessary rights to install and run docker images, run:
docker info. Please ensure that you don’t get an error like permission denied, and rather as expected see the details of your docker installation.
- Docker Compose
- The recommended version is >= 1.18.0
-
IMPORTANT. The running docker host must have the
vm.max_map_countsetting variable to be at least greater than 262144. You can check the value by running:sysctl vm.max_map_count. If it is too low, set the value by running:sudo sysctl -q -w vm.max_map_count=262144. - Bash Shell
- Installed in practically all systems by default.
- Clarification: any other Unix shell should work too, including for Windows the Unix-like environment Cygwin. However, only the Bash shell is officially supported.
- cURL
- The recommended version is >= 7.62.0
- Installed in practically all systems by default
Machine Requirements
Your server (e.g. private one, or on AWS, Azure, or Linode) should meet the following minimum requirements:
- Memory:
- OnPremises TEAM: 8GB RAM (e.g.
t3a.largeon AWS, orD2s_v3on Azure); recommended 16GB RAM (e.g.t3a.xlargeon AWS, orD4s_v3on Azure) - OnPremises ENTERPRISE: 16GB RAM (e.g.
r5a.largeon AWS, orE2s_v3on Azure); recommended 32GB RAM (e.g.r5a.xlargeon AWS, orE4s_v3on Azure)
- OnPremises TEAM: 8GB RAM (e.g.
- Disk: 50+ GB of disk space. We recommend storing all tagtog’s data in an external mounted device, e.g. AWS EBS or Azure managed Disk. Your benefits are multiple, including: it’s easier to later on mount the disk (and continue your work) in another machine, it’s easier to control accesses to the disk, it’s easier to do backups.
- GPU: not necessary.
Example setup on AWS
Start an EC2 instance with Linux, for example Amazon Linux 2 AMI x86, with type t3a.large.
After that, ssh into the newly created machine and run in bash:
sudo yum install -y docker
sudo usermod -aG docker $USER
sudo service docker start
/usr/bin/docker --version

sudo curl -L https://github.com/docker/compose/releases/download/1.25.5/docker-compose-`uname -s`-`uname -m` -o /usr/local/bin/docker-compose
sudo chmod +x /usr/local/bin/docker-compose
/usr/local/bin/docker-compose --version

sudo sysctl -q -w vm.max_map_count=262144

exit # Note, exit for the next session to pick up that the user is indeed in the docker group and can run docker commands
Example setup on Azure
Start a VM with Linux, for example Ubuntu Server 18.04 LTS with size D2s_v3.
After that, ssh into the newly created machine and run in bash:
curl -fsSL https://download.docker.com/linux/ubuntu/gpg | sudo apt-key add -
sudo apt-get update
sudo apt-get install docker-compose # it installs docker as a dependency too
sudo usermod -aG docker $USER

sudo sysctl -q -w vm.max_map_count=262144

exit # Note, exit for the next session to pick up that the user is indeed in the docker group and can run docker commands
First-time Install
- You will receive a single-line script. This script contains all the information regarding your one-server-only subscription license.
- Execute the script in some folder where you will run from now on all tagtog-related commands.
- A helper bash script is installed in this folder. This script assumes an UNIX environment and was tested only on Linux and macOS. It should work on Windows with Cygwin too. The script is not mandatory to run tagtog, but it is highly recommended.
Offline installation, updating, and running
tagtog does not require an external internet connection. This allows you to have tagtog running on your private local network with absolute safety.
An internet connection is only needed for installing and (optionally) updating your tagtog version. If you also need to install/update tagtog “offline”, you can do so by temporally (during the process) exclusively whitelisting the domain *.tagtog.com.
Run
- Choose one full-path folder/volume where all your tagtog data will be stored, and assign it to a global variable for convenience. For description purposes, let’s call this folder
$TAGTOG_HOME. Important: always write this as a full path (that is, not as a relative path such ~/tagtog or ./tagtog, but rather/my/volume/tagtog).
export TAGTOG_HOME="$PWD/tagtog_data"
- Run the application:
./tagtog_on_premises restart latest $TAGTOG_HOME

# See more parameters in the tagtog_on_premises script
- Point your browser now to:
https://<tagtog_running_ip>:<tagtog_https_port>(the port defaults to 443; you can change the port).
HTTPS & TLS (SSL) + Installing your own certificate
tagtog runs on https only and redirects all http requests to https. We recommend setting your http and https ports to the defaults 80 and 443, but you are free to choose other ports.
By default, tagtog uses a TLS/SSL self-signed certificate.
To use your own TLS/SSL certificate, place the following 2 files (with the same exact given filenames) in the folder ${TAGTOG_HOME}/ssl:
tagtog_PRIVATE_KEY.key(you can use a symlink)tagtog_SSL_CERTIFICATE.pem(you can use a symlink)
$TAGTOG_HOME folder: backups & where your data is stored
All tagtog data is stored in the folder: ${TAGTOG_HOME}. In particular, the subfolder ${TAGTOG_HOME}/persistent_data/ contains the actually persisted data (other subfolders exist, but you can ignore these details).
We recommend that you have periodic backups of this folder to avoid data losses. To do a backup, manually or programmatically, follow these steps:
- Stop a perhaps running tagtog (typically:
./tagtog_on_premises stop latest $TAGTOG_HOME) - Copy the entire
$TAGTOG_HOMEfolder (example:cp -r $TAGTOG_HOME SOME_BACKUP_FOLDER) - Restart tagtog: (typically:
./tagtog_on_premises restart latest $TAGTOG_HOME)
Proxy
The application supports http proxies and automatically recognizes your environment variables: $http_proxy, $https_proxy, and $no_proxy (either written in both all lower or all upper case).
Note: the port number must be explicitly written, regardless of whether the port is the default 80 for http or 443 for https. That is, always write something like: export HTTP_PROXY=IP:PORT.
To test that the tagtog script picks up your proxy information correctly, check the output of running:
./tagtog_on_premises extract_all_proxy_info_from_env
Run tagtog on system startup
To start tagtog at system boot, typically on Linux systems you need to add your desired commands to the file: /etc/rc.local
Therefore, you will need to add to that file something like: tagtog_on_premises start latest $TAGTOG_HOME.
You need to be aware of some caveats. This is a nice checklist to verify that everything will work fine before actually rebooting your system.
For example, you have to make sure to use full paths, the $TAGTOG_HOME environment variable must be defined or be accessible in your command/script, and you must be able to run the command as sudo / root. Also, since tagtog depends on docker, you must make sure that docker has been initialized before you run the tagtog start command.
Update
You can manually check for new tagtog updates on this link.
To download the latest tagtog version (i.e. the latest docker images), do this:
# Before updating the tagtog version, we strongly recommend to first **back up your data**
# https://docs.tagtog.com/on_premises_README.html#tagtog_home-folder-backups--where-your-data-is-stored

./tagtog_on_premises update
./tagtog_on_premises restart latest $TAGTOG_HOME
Change License
Might you have required a license change (e.g. to prolong your current installation or to increment the number of seats), you should also have received the new license details. With these, change the license of your system as follows:
# It's recommended to stop the running service first: ./tagtog_on_premises stop latest $TAGTOG_HOME

./tagtog_on_premises change_license NEW_LICENSE_NAME NEW_LICENSE_KEY

# If you have not run tagtog in a while, we also recommend you to update the tagtog version:
# https://docs.tagtog.com/on_premises_README.html#update

# Afterwards, restart tagtog as usual: ./tagtog_on_premises restart latest $TAGTOG_HOME
Troubleshooting
Upon a problem, try one of the following solutions first.
If your issue or question is not resolved yet, shoot us an email at: support@tagtog.com. If you are subscribed to the OnPremises ENTERPRISE plan, you also have access to an exclusive and private channel to quickly chat with us.
Please, in order to help you best, provide us detailed information of the problem and send us always the tagtog docker container logs:
# For example:
docker logs --tail 10000 tagtog_webapp_1 &> tagtog_webapp_1.$(date -u '+%Y-%m-%d-%s').log
docker logs --tail 10000 tagtog_taskmanager_1 &> tagtog_taskmanager_1.$(date -u '+%Y-%m-%d-%s').log
docker logs --tail 10000 tagtog_ml0_1 &> tagtog_ml0_1.$(date -u '+%Y-%m-%d-%s').log
Conflicts with ports (0.0.0.0:80: bind: address already in use …)
By default, tagtog runs and exposes http on the port 80, and https on the port 443. You can change these in two ways:
a) Set the special environmental variables:
export TAGTOG_HTTP_PORT=9080 # For example
export TAGTOG_HTTPS_PORT=9443 # For example
b) Pass the ports parameters into the tagtog running script:
./tagtog_on_premises restart latest $TAGTOG_HOME 9080 9443
Issues with document uploading, or with the docker container tagtog_taskmanager_1:
Try:
- Remove all queued documents for parsing:
find $TAGTOG_HOME/tmp/to_process/ -mindepth 1 -delete # you might need sudo access - Remove all queued training jobs:
find $TAGTOG_HOME/tmp/training_jobs/ -mindepth 1 -delete # your might need sudo access - the application:
./tagtog_on_premises restart latest $TAGTOG_HOME
If you using tagtog’s ML, please also take a look at this troubleshooting.
Issues in an update
Try:
echo "0" > LATEST_VERSION
./tagtog_on_premises update
./tagtog_on_premises restart latest $TAGTOG_HOME
Problems with documents
Remove “zombie” documents
On a few rare cases, the tagtog system might complain about some duplicate documents that are not findable anywhere. We call these “zombie” documents. They are the result of some hanging cache in our internal databases that was not completely removed due to some uncaught exceptions. The solution is to remove that hanging cache by running the follow script.
First, to avoid any data loss, please backup your data.
Then, run the script only to report about possible errors (not trying to fix them):
#
# **PLEASE, FIRST BACKUP YOUR DATA**
#

export TAGTOG_FIX_DOCUMENTS_SCRIPT_MODE="ONLY_CHECK"

./tagtog_on_premises fix_documents latest $TAGTOG_HOME
Finally, once you are sure about the errors and what you are doing, run the script to automatically fix the possible errors:
#
# **PLEASE, FIRST BACKUP YOUR DATA**
#

export TAGTOG_FIX_DOCUMENTS_SCRIPT_MODE="CHECK_AND_FIX_AUTO"

./tagtog_on_premises fix_documents latest $TAGTOG_HOME
Lack of writing file access
On some rare cases, the docker containers cannot hold writing access to the $TAGTOG_HOME folder and file hierarchy.
In this case, figure out why that could be the case. Anything related to your user not having enough rights?
Otherwise, a quick solution is:
- Grant all permissions to everybody:
chmod -R 777 $TAGTOG_HOME - Restart the application:
./tagtog_on_premises restart ...
ml0 tagtog service taking 100% of CPU or memory
Currently, in some cases tagtog ML can consume too much CPU or memory. You can verify that it’s indeed the ml service (ml0) the one overloading the machine by checking docker stats, and looking for the tagtog_ml0_1 container.
We are working on a stable fix. For now, you can quickly liberate the resources by restarting the ml0 service only (not the entire tagtog app):
# export TAGTOG_HOME=...
docker-compose -f docker-compose.override.yaml --project-name tagtog restart ml0
Important: we also recommend following this troubleshooting.
Note: you can add the following cronjob to your crontab file to restart the ML periodically (say every 12 or 24 hours). In this case, better write an absolute path to: docker-compose.override.yaml.
Example:
crontab -e

# And then type in (example of cronjob running every day at 1am):
0 1 * * * export TAGTOG_HOME=... && docker-compose -f /PATH/TO/TAGTOG/docker-compose.override.yaml --project-name tagtog restart ml0
tagtog docker images not found, on a new server installation
Chances are that you must re-do a first-time installation on your new server/instance, like this:
./tagtog_on_premises first_installation LICENSE_NAME LICENSE_KEY
Do the above if you encounter something like this:
Creating network "tagtog_default" with the default driver
...
Pulling db (tagtog_db:3.2018-W21.0)...
ERROR: The image for the service you're trying to recreate has been removed. If you continue, volume data could be lost. Consider backing up your data before continuing.

Continue with the new image? [yN]y
Pulling db (tagtog_db:3.2018-W21.0)...
ERROR: pull access denied for tagtog_db, repository does not exist or may require 'docker login'
.............................One process could not be started. Check the logs of 'tagtog_jobmanager_1'
The TAGTOG variables are not available when running as sudo
You NEED NOT to run tagtog as the root user. Actually, we recommend against this.
If for any reason, however, you do want to run as sudo, you might also need to expose your user environment variables to the root user with the -E parameter, as follows:
sudo -E ./tagtog_on_premises restart ...
“SSL certificate problem…” when curl‘ling
If you get something like the following, you likely need to upgrade your curl version (see above for the recommended version) and/or your OpenSSL version.
curl: (60) SSL certificate problem: certificate has expired
More details here: https://curl.haxx.se/docs/sslcerts.html

curl failed to verify the legitimacy of the server and therefore could not
establish a secure connection to it. To learn more about this situation and
how to fix it, please visit the web page mentioned above.
An error happened:
TLS/SSL certificate warning (security risk)
By default tagtog OnPremises uses a self-signed certificate. This means that, when accessing your tagtog installations, all browsers will either report a security warning or not even allow entering the site.
Your solutions are three, either:
- Accept (trust) the tagtog default self-signed certificate in your browser. As this entirely depends on your individual browser, version, and sometimes OS too, please look up your specific case.
- Create your own self-signed certificate and install the TLS/SSL certificate in your tagtog instance. You will still need to configure your browser/s to trust that certificate.
- Buy a certificate from a well-known Certificate Authority & consequently install this certificate in tagtog.
The webapp or another container just logs “Killed”
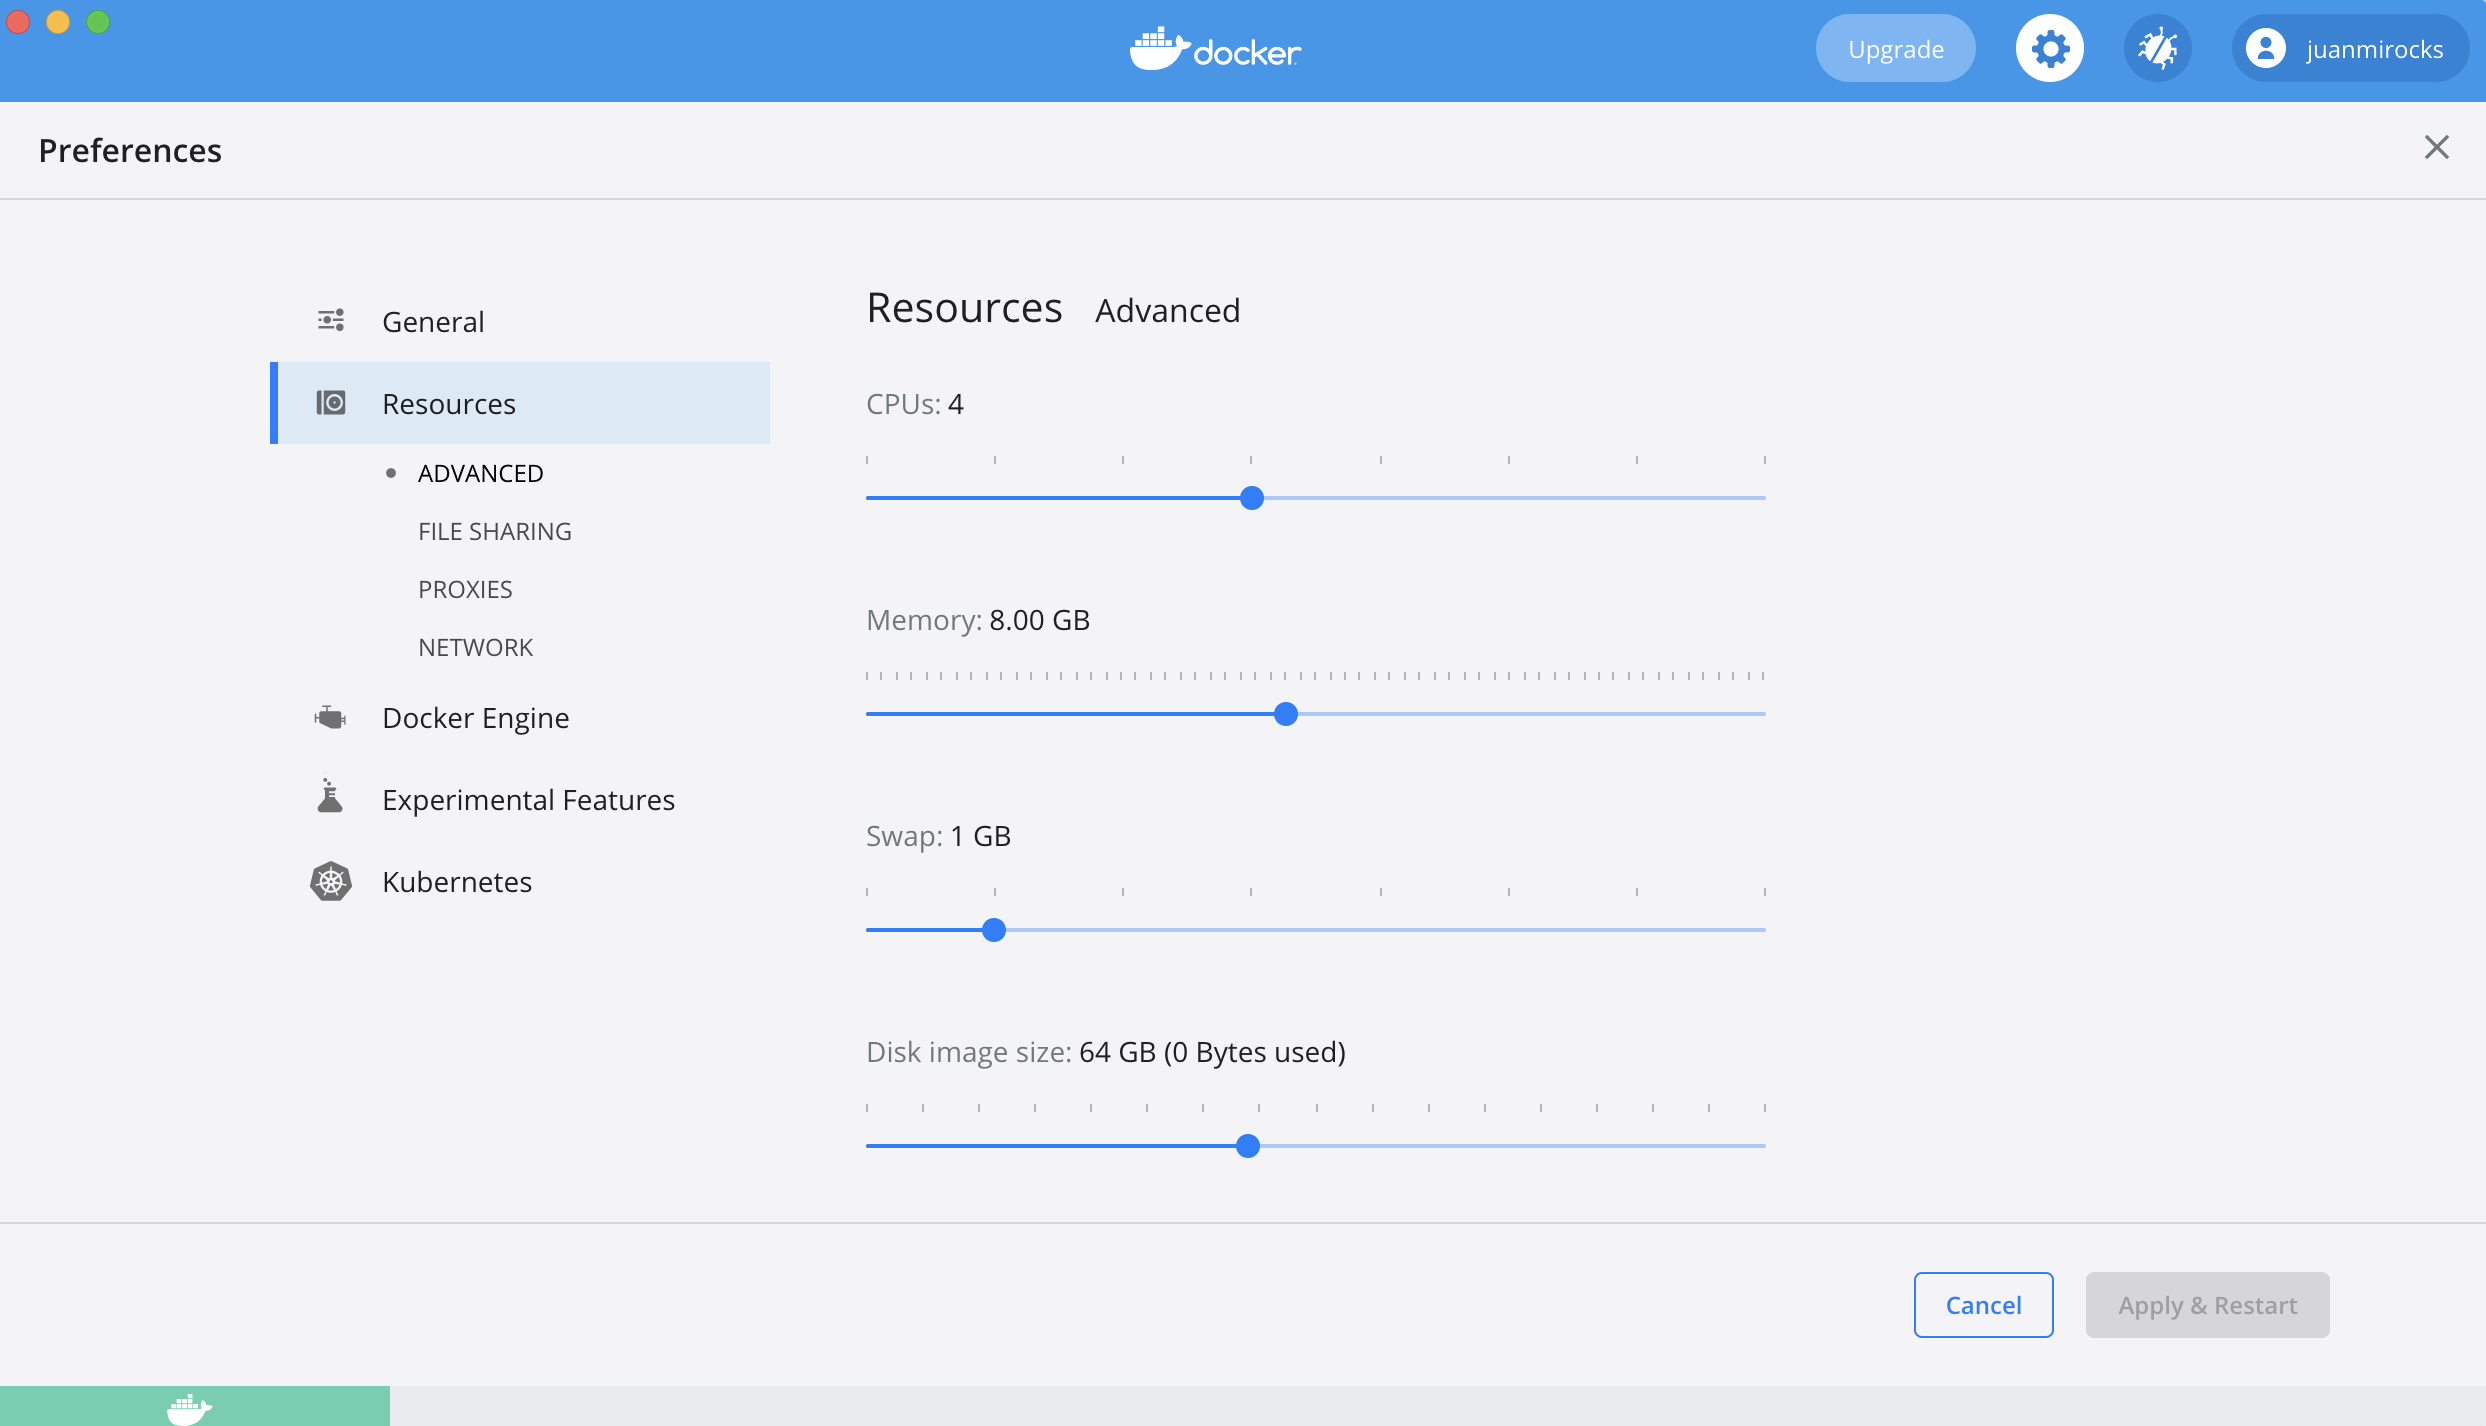
If you read “Killed” or “Killed process” in one of the containers’ logs, chances are that you need to increase the memory of your server / VM. Please consider our minimal & recommended machine requirements.
If you are running Docker Desktop, on Windows or macOs, you need to look into these preferences, and increase the memory if needed:
Changing the tagtog license in an offline / air gapped machine
You need to make sure to run the command to change the tagtog license & then run tagtog for just-one-time (to validate the license against tagtog.com servers) in a machine with internet access.
To keep all your existing data and still change & validate your new license, you have at least these options:
a) Give temporary internet connection to your end offline server, at least just whitelisting the tagtog.com domain, to do the license change & validation. Right after this, you can cut off the internet again.
b) Copy all your tagtog data (the $TAGTOG_HOME folder) to a temporary machine with internet connection, then do there the license change & validation, and then finally move back the tagtog data to your end server. Of course, you should remove the data from the temporary machine.
I don’t know which tagtog version I’m running… how to find out?
You can get which tagtog version you are running, in at least three ways:
- Cat & copy the content of the file:
LATEST_VERSION(located along thetagtog_on_premisesscript). - By inspecting the HTML content of the tagtog frontpage (without being logged in), written as a HTML comment right at the end:

- By running this command:
docker images --filter=reference="tagtog:[^l]*" --format={{.Tag}} | head -n 1
To benefit from all new tagtog features & improvements, we always recommend you to update to the latest tagtog version.
TLS/SSL termination
tagtog runs by default on https only. In most cases, we recommend against doing TLS/SSL termination.
If you really need this, please contact us.